Like a lot of photographers, I see – and show – my photographs in a digital form, in other words, on screen. Just recently however, I’ve had a yen to show some of them in art shows, craft fairs, etc. To that end, I’ve had them printed by online digital print shops, and that’s thrown up some new – and expensive – problems.
I’ve had shots printed as 4×6 and 5×7 for photo album use and when one or more of them have had printing problems, too dark, too light, etc., I’ve either sucked it up and said, “Good enough!” or thrown it away and moved on with my life.
But when it comes to bigger prints for showing purposes – what the digital labs of today often refer to as ”wall art” – then you could easily be spending between $100 and $200 dollars for the print, and that makes it considerably more stressful when you’re faced with opening up their package that just arrived in the mail.
Here’s the problem I’ve recently experienced: the picture looks great on my monitor, the print came back way too dark.
The monitor image is viewed via transmitted light which reveals a depth of detail and level of contrast that often goes missing in the printed piece which is viewed with reflected light. That means you have to look at that wonderfully detailed, moody, perfectly exposed work on your monitor and say, “Nah, gotta lighten it up.”
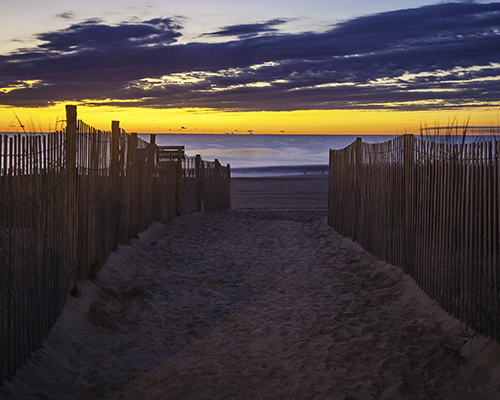
I just had printed a photo of a sunrise at the beach where the sky only occupies the top third of the picture and the rest is the dark beach and a fence on both right and left sides leading the eye down to the water and the sunrise. Looked great on my monitor. I uploaded the image for printing thinking, “Man, someone’s gonna be willing to pay big bucks for this!”
What the digital labs do really well is package photos for shipping. Some of them are so well tied down you need a collection of carpentry tools to get at the thing. When I opened the sunrise photo – after twenty minutes of sawing, chiseling, and knifing the brown paper, bubble wrap, ties, and many layers of tape, there was a well exposed sky over the dark, muddy brown mess that used to be sand. Aarghh! Too dark! What happened to my subtle detail?
Well, it got lost in the monitor I guess. And this is the problem, are adjustments really needed to the picture-perfect image on your screen to ensure it looks good on paper? The answer is yes, sometimes.
If your image has a fairly even mixture of lights and darks there’s a good chance that what looked great on your monitor will appear equally well on paper. It’s when you move into the realm of “subtle detail” that you run the risk of ending up with a muddy print.
Just to make matters worse for me, I spent 20 years making prints in darkrooms so I have knowledge of the way things used to be. I would usually make a test print- often just using a strip of photo paper – and make an assessment of whether or not the image needed to be made a little lighter here, maybe a touch darker there – it was known as burning and dodging and it happened while the image was being exposed to the paper.
These days – and I’m guessing here because I’ve never been involved in the digital process – I assume the image is brought up on a monitor – maybe just like yours at home – and zapped off immediately to the printer. What comes out is what is sent to you in the mail. Dodging and burning these days is accomplished – by you – via Photoshop or some other graphics application. It’s up to you to make it suitable for printing before uploading your image.
I’ve considered getting a new print – properly exposed of course – and replacing the bad one using the frame and glass and mount boards they’ve already sent to me, but the labs often tell you not to mess with their mounting/framing efforts because it’s beyond your skills and you’re not going to be happy.
This, like all new ventures, has been a learning experience and, though expensive, is still cheaper than buying my own printing setup. But that’s a topic for another day.

Leave a Reply