One of the really useful things about cell phone photography is the portability of the camera. And telephone, and message machine, and search engines, and everything else that’s crammed into these devices.
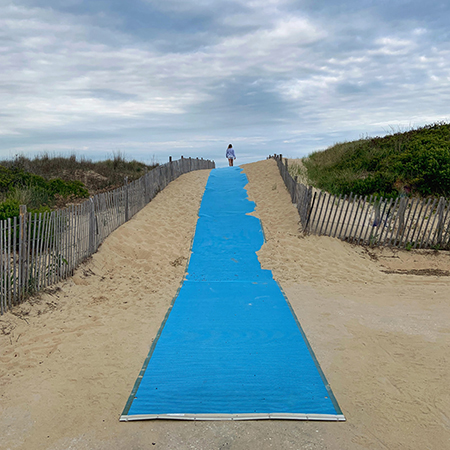
Just north of Rehoboth Beach, Delaware is Cape Henlopen State Park. I went there a couple of days ago ostensibly to photograph at sunset the two WWII lookout towers that are on the beach. After parking my bike, I was pleasantly surprised to see a long, blue mat leading over the sand dune on the way to the ocean. I say “pleasantly surprised” because some of those dunes can make it hard going, especially in flip-flops.
I was still busy being “pleasantly surprised” when I noticed someone ahead of me on the mat cresting the dune. I got the feeling that a photo was in front of me but rapidly disappearing. Do you know that feeling? I quickly raised my phone (which happened to be in my hand at that moment) and just had time for one click before the woman disappeared over the dune.
We don’t as yet have many photographs on Instagram (and even fewer followers!) but this one got a pretty good reception.
Photographs can appear before you at the most unexpected times so it’s wonderful to have something so portable – and providing such high quality output.
Incidentally, the lookout tower shots didn’t work out as the sun disappeared behind the clouds right after I arrived and stayed there through the sunset. Can’t win ’em all.
My iPhone 6s was close to giving up the ghost so I began looking into a replacement. The Xr looked like the one for me, but gee, so much money. The man at the Apple store looked at my 6s and said he’d give me $200 discount on a Xr (which, I discovered is pronounced ten r, not ex r). Had I waited until my 6s died I would have received bupkus so the moral is, (and I’m sure Apple would agree) get a new one before the old one dies. Incidentally, I’m also in the market for a new iMac and the latest version can be a little over two thousand bucks which is also not peanuts – this computer biz is expensive. Anyway, the Apple website claims my existing five year old iMac will yield a rebate of $570 so that helps.
Back to the iphone, the Xr is a little longer than the 6s (and I didn’t need that, but there it is) and there are several other changes. It’s good to have a battery that lasts longer than five hours and it’s great to have 64GB of memory instead of 16.
My
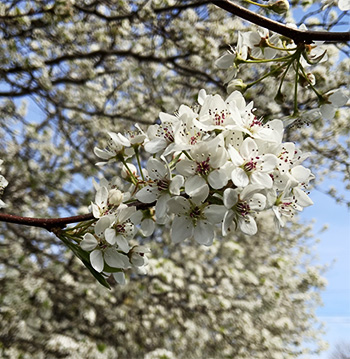
favorite improvement though, is in the camera. So many pixels! Even my
most boring shots have impressive quality. There’s a camera setting new
to the Xr called “Portrait” that throws the background a little out of
focus so the viewer can concentrate on the face and ignore background
distractions. Of course, you don’t actually have to shoot a human to use
it in portrait mode, I tried it on blossoms and you can see the
results. Photographically speaking, I think this camera and I are going
to get along.
Like a lot of photographers, I see – and show – my photographs in a digital form, in other words, on screen. Just recently however, I’ve had a yen to show some of them in art shows, craft fairs, etc. To that end, I’ve had them printed by online digital print shops, and that’s thrown up some new – and expensive – problems.
I’ve had shots printed as 4×6 and 5×7 for photo album use and when one or more of them have had printing problems, too dark, too light, etc., I’ve either sucked it up and said, “Good enough!” or thrown it away and moved on with my life.
But when it comes to bigger prints for showing purposes – what the digital labs of today often refer to as ”wall art” – then you could easily be spending between $100 and $200 dollars for the print, and that makes it considerably more stressful when you’re faced with opening up their package that just arrived in the mail.
Here’s the problem I’ve recently experienced: the picture looks great on my monitor, the print came back way too dark.
The monitor image is viewed via transmitted light which reveals a depth of detail and level of contrast that often goes missing in the printed piece which is viewed with reflected light. That means you have to look at that wonderfully detailed, moody, perfectly exposed work on your monitor and say, “Nah, gotta lighten it up.”
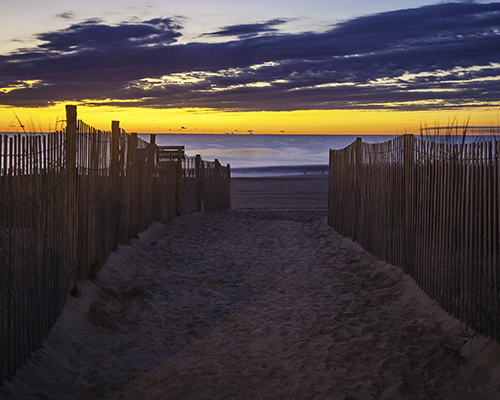
I just had printed a photo of a sunrise at the beach where the sky only occupies the top third of the picture and the rest is the dark beach and a fence on both right and left sides leading the eye down to the water and the sunrise. Looked great on my monitor. I uploaded the image for printing thinking, “Man, someone’s gonna be willing to pay big bucks for this!”
What the digital labs do really well is package photos for shipping. Some of them are so well tied down you need a collection of carpentry tools to get at the thing. When I opened the sunrise photo – after twenty minutes of sawing, chiseling, and knifing the brown paper, bubble wrap, ties, and many layers of tape, there was a well exposed sky over the dark, muddy brown mess that used to be sand. Aarghh! Too dark! What happened to my subtle detail?
Well, it got lost in the monitor I guess. And this is the problem, are adjustments really needed to the picture-perfect image on your screen to ensure it looks good on paper? The answer is yes, sometimes.
If your image has a fairly even mixture of lights and darks there’s a good chance that what looked great on your monitor will appear equally well on paper. It’s when you move into the realm of “subtle detail” that you run the risk of ending up with a muddy print.
Just to make matters worse for me, I spent 20 years making prints in darkrooms so I have knowledge of the way things used to be. I would usually make a test print- often just using a strip of photo paper – and make an assessment of whether or not the image needed to be made a little lighter here, maybe a touch darker there – it was known as burning and dodging and it happened while the image was being exposed to the paper.
These days – and I’m guessing here because I’ve never been involved in the digital process – I assume the image is brought up on a monitor – maybe just like yours at home – and zapped off immediately to the printer. What comes out is what is sent to you in the mail. Dodging and burning these days is accomplished – by you – via Photoshop or some other graphics application. It’s up to you to make it suitable for printing before uploading your image.
I’ve considered getting a new print – properly exposed of course – and replacing the bad one using the frame and glass and mount boards they’ve already sent to me, but the labs often tell you not to mess with their mounting/framing efforts because it’s beyond your skills and you’re not going to be happy.
This, like all new ventures, has been a learning experience and, though expensive, is still cheaper than buying my own printing setup. But that’s a topic for another day.