One of the really useful things about cell phone photography is the portability of the camera. And telephone, and message machine, and search engines, and everything else that’s crammed into these devices.
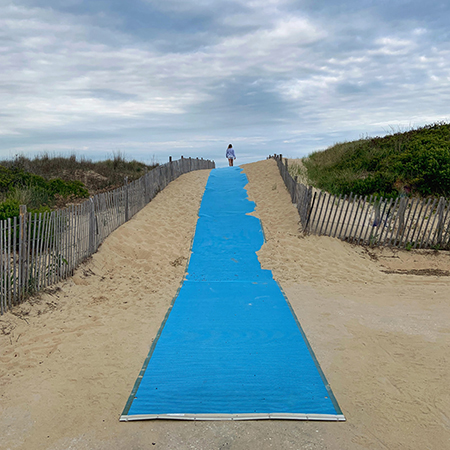
Just north of Rehoboth Beach, Delaware is Cape Henlopen State Park. I went there a couple of days ago ostensibly to photograph at sunset the two WWII lookout towers that are on the beach. After parking my bike, I was pleasantly surprised to see a long, blue mat leading over the sand dune on the way to the ocean. I say “pleasantly surprised” because some of those dunes can make it hard going, especially in flip-flops.
I was still busy being “pleasantly surprised” when I noticed someone ahead of me on the mat cresting the dune. I got the feeling that a photo was in front of me but rapidly disappearing. Do you know that feeling? I quickly raised my phone (which happened to be in my hand at that moment) and just had time for one click before the woman disappeared over the dune.
We don’t as yet have many photographs on Instagram (and even fewer followers!) but this one got a pretty good reception.
Photographs can appear before you at the most unexpected times so it’s wonderful to have something so portable – and providing such high quality output.
Incidentally, the lookout tower shots didn’t work out as the sun disappeared behind the clouds right after I arrived and stayed there through the sunset. Can’t win ’em all.
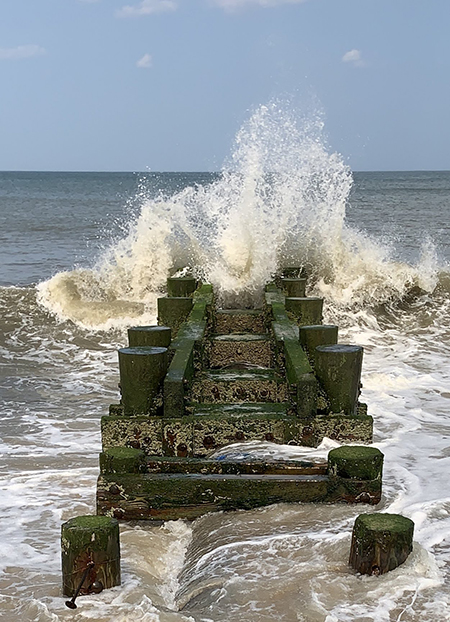
I could see the occasional wave splashing high in the air as it hit the breakwater and I took a few steps toward it as the photographer in me said, “There’s something happening over there – move yourself!”
The problem of course with trying to photograph an event that happens quickly, infrequently, and inconsistently is, how to get the shot? How to press the shutter at what Henri Cartier-Bresson termed the, “Decisive Moment?”
Well, these days we’re fortunate not to have to take dozens of shots in the hope you’ve timed it correctly because we have “burst” mode.
On the iPhone, burst mode means keeping your finger pressed down on the shutter release until the event is finished. Don’t forget to hold the camera steady, or, better yet, use a tripod or other means of support.
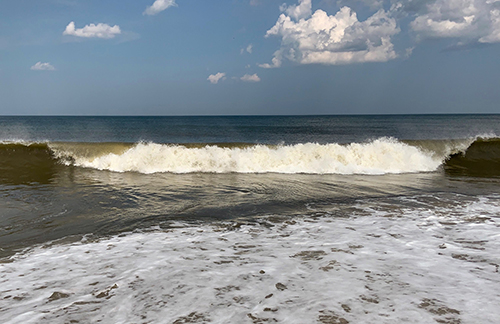
The two photos shown here were the result of about 70 photos being taken in burst mode – Bresson would probably be horrified.
I stood at the end of the breakwater, and waited for a big wave. As the water swelled and looked promising, I pressed the shutter and held the phone steady. I saw the splash through the viewfinder and finally released the shutter. It seemed to last about three or four seconds and I had 35 shots when it was over.
When reviewing the results on the iPhone, a single image is shown to represent the burst and at the top of the screen there’s a message that says, “Burst (35 (or some such number) images). Below the image is the word “Select.” Tap select and the entire sequence of shots is revealed. You can then swipe side to side through the shots and tap the ones you wish to keep. Those tapped images get a check mark and when you tap “Done,” the software asks, “Would you like to keep all the photos or only the checked ones?” Tap “Keep only the favorites” and you’re left with one or two good shots that you’ll be happy to show people.
My iPhone 6s was close to giving up the ghost so I began looking into a replacement. The Xr looked like the one for me, but gee, so much money. The man at the Apple store looked at my 6s and said he’d give me $200 discount on a Xr (which, I discovered is pronounced ten r, not ex r). Had I waited until my 6s died I would have received bupkus so the moral is, (and I’m sure Apple would agree) get a new one before the old one dies. Incidentally, I’m also in the market for a new iMac and the latest version can be a little over two thousand bucks which is also not peanuts – this computer biz is expensive. Anyway, the Apple website claims my existing five year old iMac will yield a rebate of $570 so that helps.
Back to the iphone, the Xr is a little longer than the 6s (and I didn’t need that, but there it is) and there are several other changes. It’s good to have a battery that lasts longer than five hours and it’s great to have 64GB of memory instead of 16.
My
favorite improvement though, is in the camera. So many pixels! Even my
most boring shots have impressive quality. There’s a camera setting new
to the Xr called “Portrait” that throws the background a little out of
focus so the viewer can concentrate on the face and ignore background
distractions. Of course, you don’t actually have to shoot a human to use
it in portrait mode, I tried it on blossoms and you can see the
results. Photographically speaking, I think this camera and I are going
to get along.
Adobe Creative Cloud, which came into being in October 2011, uses a software subscription method which means you purchase and download the products over the Internet. Because of this instant method of updating the software, you always have the latest version available.
I said in an earlier posting that there were 23 different software packages available in the CC version, but the ones I use most are Photoshop, Lightroom, Premiere Pro, Illustrator, Bridge, InDesign, and, to a lesser extent, Dreamweaver.
For sure there are alternatives to Adobe products that are cheaper, and some are even free. But if you want the always new, Rolls-Royce of graphics-based software, Adobe is where you belong. Here’s where you can find the latest prices.
Presently Adobe allows for either a monthly or annual subscription of either individual products or the entire suite of software. We at webclearly found that we wanted so many of their offerings that it wasn’t cost effective to cherry pick so we get the whole package. We’ve purchased them for several years now so we’ve had a lot of opportunity to learn the ins and outs of several of their products and we are happy.
Probably the software with the most features, and therefore the one that takes the longest to learn, is Photoshop. Of course, it’s best to start off simple – try manipulating an image or two of your own: crop, resize, save – these are the basics and what you should look to accomplish first. There are tutorials on YouTube for these manipulations, heck there are tutorials on how to open Photoshop and set up the workspace, everything you’ll ever need to learn can be found via a search engine. However, if you live in the Washington, D.C. metropolitan area there is an alternative: your local library.
The public libraries of Washington, D.C., Fairfax County, Montgomery County, Prince George’s County, and Prince William County, all offer free access to Lynda.com where you can find tutorials for Photoshop – and so much more. Lynda.com is reason enough to get a library card.
If you still want to go the Google route, just enter Beginning Photoshop tutorials and you’ll find literally millions of results for you to peruse. The ones I come back to include:
Anthony Morganti (https://www.youtube.com/user/AnthonyMorganti), Goes into lots of detail at a steady pace (some would say slow) covers many types of software and puts out more videos than anyone else I subscribe to; and Helen Bradley (https://www.youtube.com/channel/helenbradley), very pleasant voice, explains complicated procedures in a simple manner, and, like the other people I just listed, she also covers Lightroom and Illustrator.
There are other YouTube creators that I see sometimes but the list above contains my go to people to explain everything Photoshop and it’s less formidable than ploughing through Google search results.
My experience with YouTube tutorials (and I’ve seen a LOT) is it’s really a matter of finding a presenter who goes at a speed that suits you, teaches at your level, and whose accent and presentation style you can live with. There are lots of YouTube presenters out there and the accents and style range from transfixing to fingernails on the chalkboard.
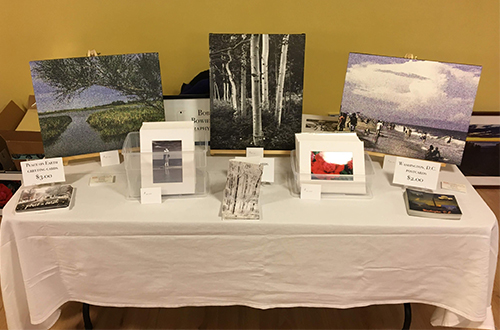
I recently entered some of my photographs into an art show, something I’ve been pondering for a while. I have a boatload of photos and it’s been bothering me about what to do with them. Letting them sit on my hard drive meant doing nothing with them, plus, it was annoying me that I’d gone through the process of shooting, post-processing, and in some cases, printing of those photos, and now what? It’s not that I thought the world was lacking something by not experiencing my portfolio – but it sure was starting to bug me that I was the only one looking at them.
An opportunity came along recently when a neighbor wrote to see if I wanted to exhibit in her December art show. She would provide a six foot long table and a chair, the rest was up to me. I realized this was my chance to finally do something with my work so I set about preparing. Here’s what that preparation involved and the learning experience:
Get the prints made – a huge learning experience that deserves it’s own blog entry;
Buy easels to support three or four 16×20 prints;
Buy 8×10 mats to hold 5×7 prints – you may have been to art shows where someone may have several large pieces on display and then a box or two of smaller ones for leafing through? Well, that’s what my 8x10s were for. Preparing them involved taping together a front piece with a 5×7 window and an 8×10 backing board. I also had to buy hinging tape to hold the two pieces of board together and sticky corners to hold the photos in place;
Put these photos and boards together – I had more than 60. I learned to only use the sticky corners on the top two corners of the photo, and tape it to the front board (the one with the hole in it). Use 1 3/4 inch hinging tape, not the skinnier variety, and try to cut that tape to exactly the length needed for the board because cutting off excess linen hinging tape is a bear.
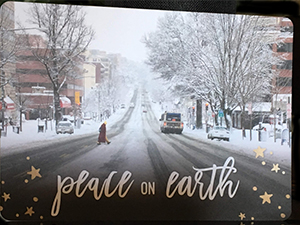
Foldable greeting card
Catalog my images. This took the longest time of course because I’d never organized my collection in any meaningful way before. It involved giving each photo a unique ID number, a filename, a description, and a location on an external hard drive for the original image plus the 5×7 version. The original was required in case someone saw a 5×7 but asked for an 11×14, then I would need the original to make a larger version.
Buy a decent pen so I could write that ID number on the back of every print. Write it on a label, not the print itself.
I had two types of greeting cards made, one foldable which means you could open it and write your inscription inside, and one flat – both came with envelopes. The front of the cards each had a snow scene of mine – it was December after all. Next time I would just get the foldable type.
Flat greeting card
I put together a montage of DC monument shots into one image to make a Washington, DC postcard arrangement. I sold zero of these so I wouldn’t do that again.
Get a rubber stamp made that gave me credit for the photos. Stamp onto a label, not the print.
What if I actually sold something? How would I handle a credit card? I bought an attachment from Square that plugs into my phone, connected it to webclearly’s bank account and was ready for almost any credit card. In the end, one person wrote a check and the rest paid cash. The Square experience was still worth it though, for my peace of mind and any future art show I might participate in.
If I sold one of those 16x20s how would I wrap it up? I bought a roll of bubble wrap from the drug store, some big bags to hold the big prints, and plastic bags for the 8×10 photos.
I printed notices for how much the various items cost. I bought tiny stands to hold those price announcements.
I bought a couple of clear plastic containers to hold the 60 mats so people could ‘leaf’ through them. Lydia loaned me a tablecloth to cover the table.
It took the best part of a month to put all this together but it was worth it! The whole experience was fun because it interested me – much better to spend your time doing something you’re interested in than a) doing nothing, or b) doing something you don’t care about. I sold seven matted prints and 12 cards. For me, that was well worth it.
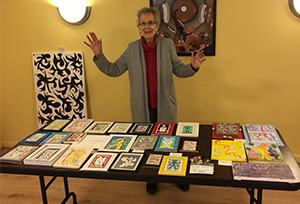
Rose Mosner and her artwork
I had a good time with my fellow exhibitors one of whom is a webclearly customer, Rose Mosner, plus it was her 92nd birthday! Happy birthday Rose. As someone pointed out to me, you don’t exhibit for money, you do it for the ego boost. I guess they are correct – it was a great ego boost to have people say, “I like this, I like that, etc.,” and I’m now well prepared for another art show. Know of any?
Like a lot of photographers, I see – and show – my photographs in a digital form, in other words, on screen. Just recently however, I’ve had a yen to show some of them in art shows, craft fairs, etc. To that end, I’ve had them printed by online digital print shops, and that’s thrown up some new – and expensive – problems.
I’ve had shots printed as 4×6 and 5×7 for photo album use and when one or more of them have had printing problems, too dark, too light, etc., I’ve either sucked it up and said, “Good enough!” or thrown it away and moved on with my life.
But when it comes to bigger prints for showing purposes – what the digital labs of today often refer to as ”wall art” – then you could easily be spending between $100 and $200 dollars for the print, and that makes it considerably more stressful when you’re faced with opening up their package that just arrived in the mail.
Here’s the problem I’ve recently experienced: the picture looks great on my monitor, the print came back way too dark.
The monitor image is viewed via transmitted light which reveals a depth of detail and level of contrast that often goes missing in the printed piece which is viewed with reflected light. That means you have to look at that wonderfully detailed, moody, perfectly exposed work on your monitor and say, “Nah, gotta lighten it up.”
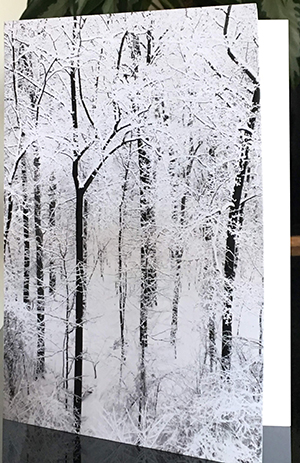
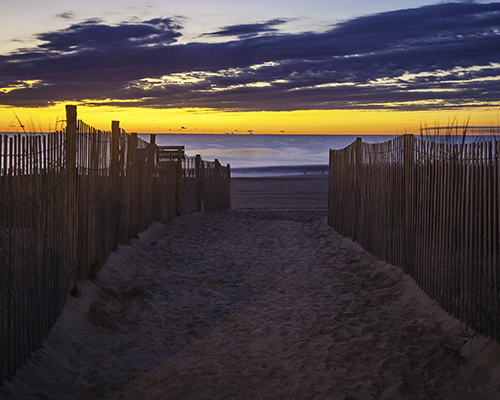
I just had printed a photo of a sunrise at the beach where the sky only occupies the top third of the picture and the rest is the dark beach and a fence on both right and left sides leading the eye down to the water and the sunrise. Looked great on my monitor. I uploaded the image for printing thinking, “Man, someone’s gonna be willing to pay big bucks for this!”
What the digital labs do really well is package photos for shipping. Some of them are so well tied down you need a collection of carpentry tools to get at the thing. When I opened the sunrise photo – after twenty minutes of sawing, chiseling, and knifing the brown paper, bubble wrap, ties, and many layers of tape, there was a well exposed sky over the dark, muddy brown mess that used to be sand. Aarghh! Too dark! What happened to my subtle detail?
Well, it got lost in the monitor I guess. And this is the problem, are adjustments really needed to the picture-perfect image on your screen to ensure it looks good on paper? The answer is yes, sometimes.
If your image has a fairly even mixture of lights and darks there’s a good chance that what looked great on your monitor will appear equally well on paper. It’s when you move into the realm of “subtle detail” that you run the risk of ending up with a muddy print.
Just to make matters worse for me, I spent 20 years making prints in darkrooms so I have knowledge of the way things used to be. I would usually make a test print- often just using a strip of photo paper – and make an assessment of whether or not the image needed to be made a little lighter here, maybe a touch darker there – it was known as burning and dodging and it happened while the image was being exposed to the paper.
These days – and I’m guessing here because I’ve never been involved in the digital process – I assume the image is brought up on a monitor – maybe just like yours at home – and zapped off immediately to the printer. What comes out is what is sent to you in the mail. Dodging and burning these days is accomplished – by you – via Photoshop or some other graphics application. It’s up to you to make it suitable for printing before uploading your image.
I’ve considered getting a new print – properly exposed of course – and replacing the bad one using the frame and glass and mount boards they’ve already sent to me, but the labs often tell you not to mess with their mounting/framing efforts because it’s beyond your skills and you’re not going to be happy.
This, like all new ventures, has been a learning experience and, though expensive, is still cheaper than buying my own printing setup. But that’s a topic for another day.
Trying to master the Adobe Creative Cloud suite of applications is a full time project for probably the rest of your life. This is the suite that has Photoshop, Illustrator, Lightroom, Dreamweaver and 19 more! You may not live long enough to just learn Photoshop. Even after you think you know something, you have to use that knowledge frequently (like, every day) or you’re going to forget it.
There are hundreds if not thousands of tutorials out there to help you along your path, but it you don’t take copious notes as you learn this stuff you’re going to be continually searching the Internet (how do I make an image show through text?).
Not to confuse you, but I’m going to explain a few things I’ve learned along the way that I found useful. I’ll also mention some good tutorials I’ve found.
I probably won’t do much with Dreamweaver because, well, who uses Dreamweaver any more? But Photoshop, Illustrator, Lightroom? I’ll be all over them.
Need something to do for the rest of your life? Become proficient with the Adobe Creative Cloud suite of apps. Stick around and I’ll show you how I’ve been spending my time.


 Trying to master the Adobe Creative Cloud suite of applications is a full time project for probably the rest of your life. This is the suite that has Photoshop, Illustrator, Lightroom, Dreamweaver and 19 more! You may not live long enough to just learn Photoshop. Even after you think you know something, you have to use that knowledge frequently (like, every day) or you’re going to forget it.